Blog Archives
Fly Wing Interferencies

On May 14, 2012, Daniel Gerstgrasser photographed beautiful interference colours on the wings of a fly near Zürich. (Camera Canon , 100-mm-macro-lens, f11/125sec, ISO 100). The colours are caused by interferences. The structure of the wings which consist of thin, stacked layers with different refraction indices reflect the light from each boundary where the refraction index changes. So the incoming light is split up into a wave reflected from the front side of the layer and another wave reflected from its rear side. Both waves meet in front of the layer causing the interference.
This is because one wave has to pass through the layer while the other one is already reflected from the front side. So both reflected waves are shifted against each other due to the difference in time they need for these different ways. As the different colours are caused by a difference in light wavelength, it depends from the colour of the light if this shifting causes an amplification or an extinction of the respective colour. If, for example, red is extinguished, the complementary colour, which in this case is green, remains. So the wing shimmer greenish.
Light crossing the layer in a flat angle has to cover a longer distance inside the layer. This causes a different shifting against the wave reflected from the front side of the layer than it is compared to light leaving the layer in a more pointed angle. This is why there appear different colours when looking at the wing from different directions.
Sodalite interference colours

Sodalite – sodium aluminium silicate chloride – is a mineral of volcanic origin (chemical formula: Na8Al6Si6O24Cl2) and it comes from hydrothermal fluids in a volcanic rock’s cavity. The sodalite containing rock itself is not homogenous but consists of many different, small minerals beside the blue sodalite.
The mineral itself is very nice deep royal blue in general, the piece illustrating this article was mined at Mt. Vesuvius and bought in a mineral shop in Italy. The sodalite pieces are full of other crystals, usually well visible whitish veins which mostly consist of calcite.
When looking at the mineral with the help of some magnifying device we can see small parts of it having thin and colourful layers! These coloured parts are concentrated at the edges of the calcite veins or patches and only visible in a magnified form. Here, the translucent calcite was built on the blue sodalite mineral in a later process different from the forming of the blue crystals from the original hydrothermal solution. These places must also contain a very thin layer of air which is responsible for the colours with its interference.
What is unknown: the forming of the air layers. Are they originally there or are they created when the stone is cut from the rocks? I think the later is more possible as the sodalite rocks can more easily break where the white veins run, so the chopping of the rock might create the gaps, resulting interference patterns. The process might be the same as the ice pieces with fissures showing interference colouration too.
The pictures (1 – 2 – 3) were taken with a cheap digital microscope, the magnificiation which shows the interference colours is 200X. Smaller magnification also shows it but only in tiny coloured spots.
Author: Mónika Landy-Gyebnár, Hungary
More posts to this topic:
Rings of Quételet

Rings of Quételet are caused by rays of light which had been scattered by particles of dirt on a window pane and then were reflected from the rear side of the pane, interfering with rays having been reflected from the front side of the pane and then having been scattered by the same dirt particles.
The light source itself forms a white circle being surrounded by colourful rings which are caused by interferences.
These rings always begin with a blue one right outside the white circle and end up with a red one on the other side, away from the circle, no matter if the secuence begins in the centre of the pane or on its rim.
Place : Fehraltorf, Switzerland
Time : 24 August 2011
Digital Camera : Canon EOS 450D
Exposure time : 1/2500 sec , f/9 ,Focus length 22mm, ISO 100
Author: Michael Großmann, Kämpfelbach, Germany
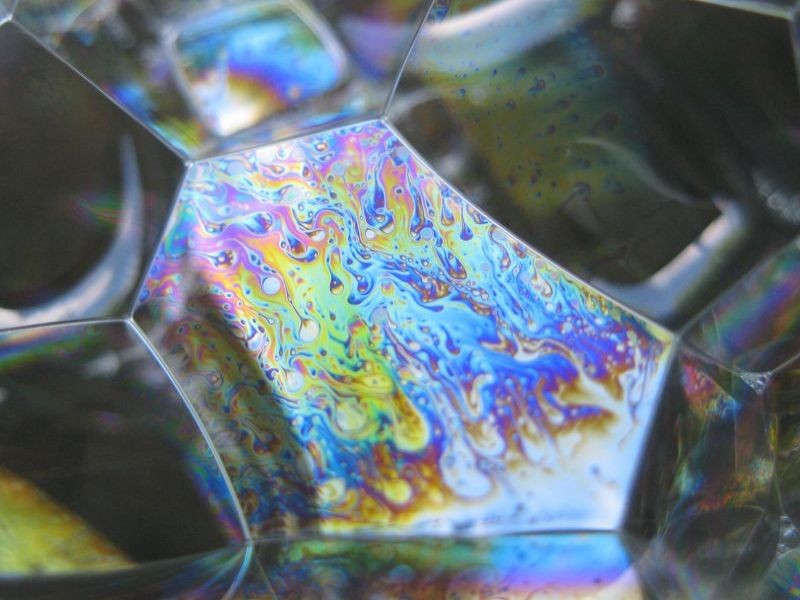
Interference Phenomena on Soap Bubble Surface

Inspired by my daughter who was playing with soap bubbles, I one day got the idea to take photographs of the surface of soap bubbles.
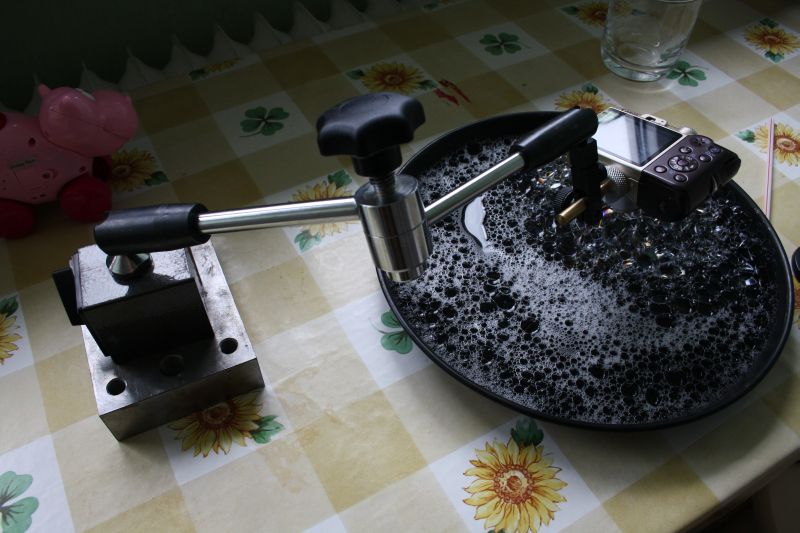
For this purpose I filled a big dark frying pan with water and put some dishwashing liquid in it. I mounted my little digicam on a clamp pod (figure 2) and aligned it roughly with the pan.
Then I blew some bubbles into the water using a drinking straw. Now I aligned the camera exactly with the vernier adjustment of the clamp pod and started photographing.
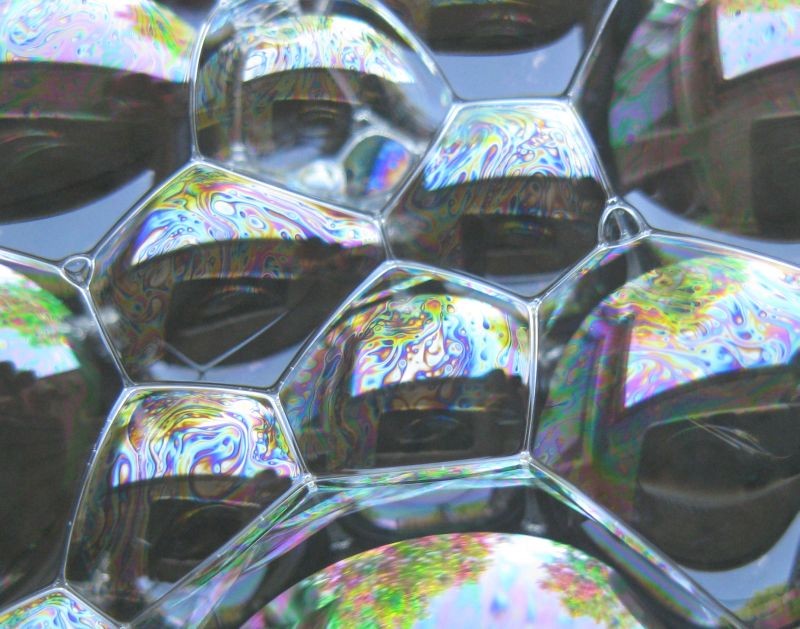
Already the first pictures turned out well, and a short while later I had made a considerable amount of pictures. I soon noticed a remarkably large variety in the positioning of the different colours on the soap bubbles. At first, the distribution of colours on the bubbles looked like a piece of abstract art, but later the colours arranged to parallel stripes, similar to a rainbow.
The reason for this play of colours:
The physical reason for these colours is the so called two-beam interference. This is remarkably well explained at http://www.itp.uni-hannover.de/~zawischa/ITP/zweistrahl.html (German) and http://www.itp.uni-hannover.de/~zawischa/ITP/twobeams.html (English).
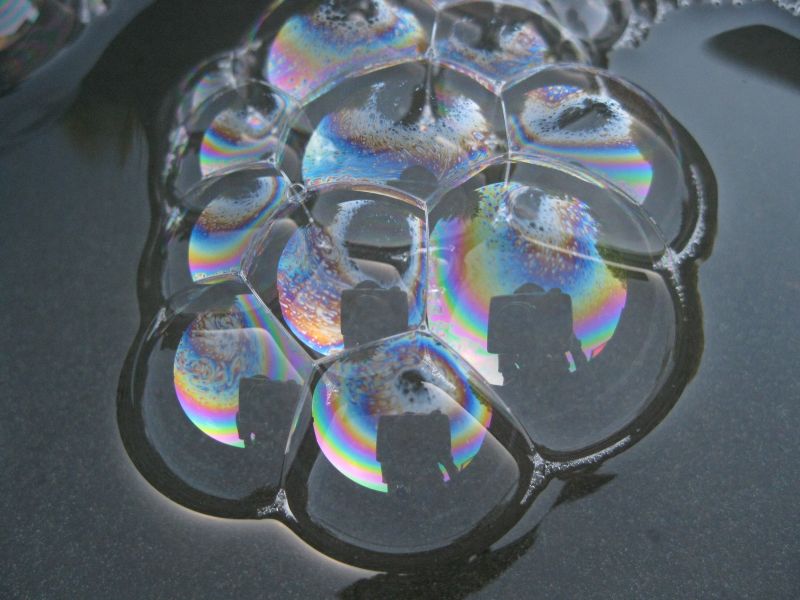
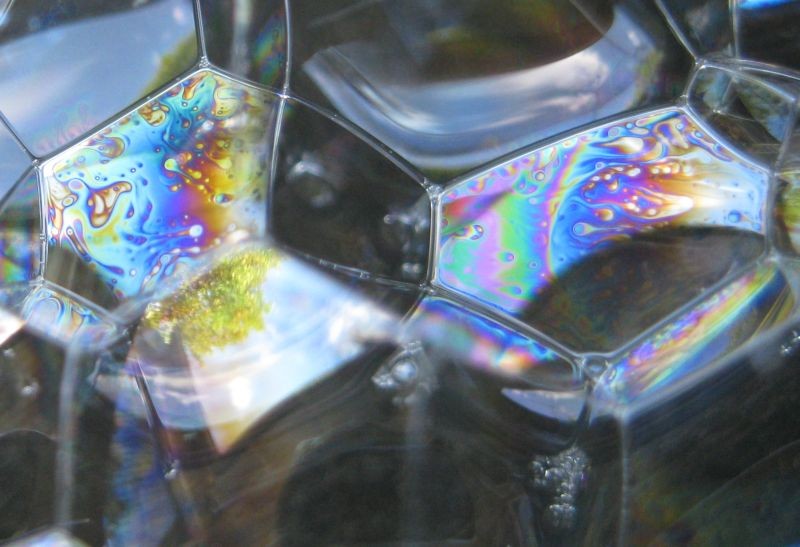
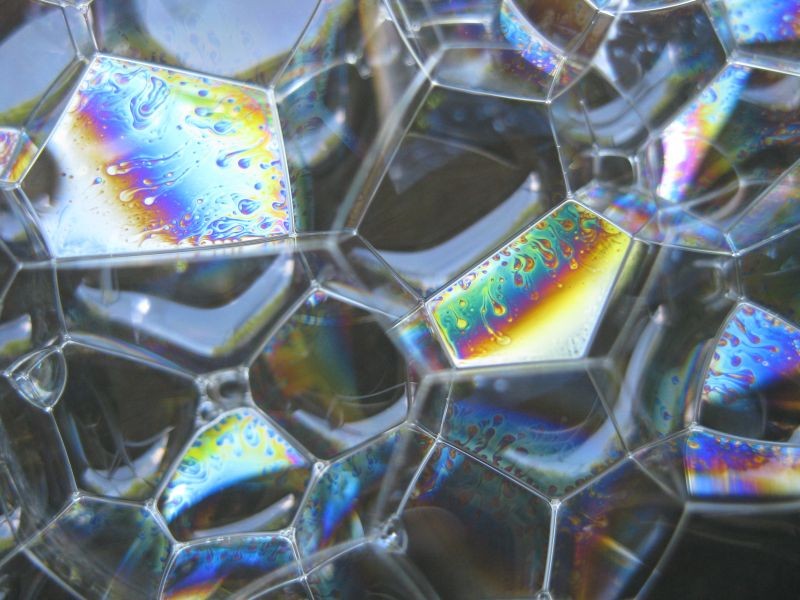
The main statement in this explanation is that the colours depend directly from the optical length of way (and so from the thickness) inside the the soap layer. This is an explanation as well for the black “holes” at the highest point of the bubbles, as also for the colourful rings below these “holes”. The colourful flaws, which can be seen especially on “fresh” bubbles, are areas of different thickness of the soap layer, which are (still) positioned irregularly. Following the force of gravity, they slowly flow downwards causing the soap layer to be thinner at the top and thicker at the bottom of the bubbles. The constantly the thickness of the soap layer increases from the top to the bottom of the bubbles, the more regularly is the positioning of the colourful rings.
The Picture above show a detail on the surface of a soap bubble.
Figure 2: Camera mounted on a c-clamp. The distance between the camera lens and the soap surface is here about 4 cms.
Figure 3: Abstract play of colours on the surface of fresh soap bubbles.
Figure 4: The lesser the flaws in the soap layers are, the more regular is the increase of the thickness of the soap layer towards the bottom of the bubbles, and so is the play of colours. The spotted dark areas on top of the bubbles indicate that the bubbles are about to burst.
Author: Reinhard Nitze, Barsinghausen, Germany
Rainbows and supernumeraries

During last weekend (Sunday 4th May -08) at city of Espoo, I observed seasons first rainbow. Local thunderstorm came along with rainshowers produring primary and secondary bows. I visually saw 3 primary supernumeraries.
In the heavily enhanced image (USM) of primary bow there is small hint of 4th supernumerary visible. Outside of seconday bow there is larger arc (dark pink color), assuming it indicates supernumerary also… The droplet sizes may been quite even, due to easily visible interference bows.
Posted by Timo Kuhmonen
Multiple rainbows

Jan. 12, 2008
Riding home on the bus this afternoon, I noticed the rainbow off to the East. The sun was low in the west and was not far from setting, so the clouds were beginning to take on a golden hue. The rainbow looked like it was repeated numerous times and fading off in the distance. I got off at the next stop and pulled out my new pocket-sized digicam and snapped a couple of pics. I checked out Les Cowley’s Atmopsheric optics page and it seems that the closest thing I could find were supernumerary bows, but these seemed to be more spaced out than the examples on his website. So is that what these are? I have included two pictures (1 2) and two contrast enhanced b&w versions of the pictures to better show the details (1 2).
Picture details: Canon SD1000, ISO 200, 1/160 sec, f4.9
Author: Darryl Luscombe, Vancouver, British Columbia, Canada
Divergent light fogbow

Observed at Tuula (Estonia) on 10th September at 00:30. The fog condition was perfect at the time for the glory””s rings merge into multiple supernumeraries. But the location was perfect as well which is surrounded by forest from east and west side generating the wind tunnel to blow the fog from the bog field in north or from the river in south. As long as I remember this location has been always very foggy and has been often flooded in spring-time. The light source I used was Johnlite-2940, which makes the car””s headlights a joke.
I also observed a very bright and colourful glory and took some close-ups.

at 43mm.
Here still photos with 24mm and 30mm.
Author: Marko Krusel
Primary, Secondary and Interference Rainbow

Mike Nicholson took this shot just after sunup on Sept 7 2006 last. He has to enhance it in PhotoShop Elements 4.0 so the colour is a bit overdone. It was shot on a Pentax *ist DS, 18-55mm lens set to 20mm. ISO was on auto (probably 200), 1/250 sec f/8. A circular polarizer was used.
Location: Papatoetoe, Auckland, New Zealand.
Interference arc outside of secondary 9-28-06


I was outside watching small rainshowers come and go and later on as the sun came out I got small rainbow fragments here and there. Later on while helping my mother take care of the farm animals another strong rainbow formed and this one was unusual because I counted 4 supernummery arcs inside the main bow and I could also see a very well-defined supernummery outside the secondary bow. I enhance both macro images made of the two bows. The USM of the primary shows 5 supernummeries.
[Posted by Michael Ellestad]
Polarized fogbow in car headlights

I spent the past summer at Langmuir Laboratory on the Magdalena Mountains, in southwest-central New Mexico (USA) at an elevation of 3.2 km. The purpose of this was thunderstorm research. The monsoon here was unusually wet and on several days and nights the mountain laboratory was actually foggy. This is relatively rare considering the New Mexico climate. I took this opportunity to view polarized fogbows in my car”s headlights, and on September 2nd, I was particularly successful.
When I programmed a Mie simulation algorithm late last year and plotted a polarized fogbow on my screen, I was surprised that the polarized bow looked as it did, with the typical Brewster”s angle ”gap” in the main bow for parallel polarization. How excited I was to see that the actual fogbow indeed looked like the simulation! I had never seen it before in nature.
I am sure this has been done before by someone else, but I thought I would post the images anyway.

I covered up one of the car”s headlamps as to not have a double bow. I positioned myself about 50 meters in front of the truck, which I had parked on a slight inclination so the bow would be better visible against a featureless sky and be more complete. The fisheye lens was equipped with a polarizer at the place in the lens where the rays go parallel.
The simulation I made earlier, for a 10 micrometer radius droplet. It looks sharper because I assumed a point light source, assumed a monodisperse droplet distribution, and it was not divergent light. It is not a perfect match either considering the placement of the supernumeraries: probably the droplets in the actual display were a bit smaller. Because of the divergent light source, and because I don”t know the distance to the truck accurately, I doubt I will ever be able to accurately tell the actual droplet radii in the display.
The polarized glory was also obvious, but my shadow was blocking most of the part that was most polarized. I am including the unpolarized glory here.

The close-ups of the polarized and unpolarized fogbow were made with a 24mm/2.8 lens. The camera was a Canon 300d (modified version – i.e. with IR filter removed). I did not need to adjust the brightness and contrast much to get the results as displayed here. The fogbow had good contrast by itself.
About 10 days later I documented a natural fogbow in sunlight from the laboratory, through a polarizer. I photographed that with film; I have not processed those photos yet.
[Posted by Harald Edens]
