Category Archives: experimental
Quinary rainbow in lamplight, plus a twisted primary and nice supernumeraries
In my last blogpost, I described how tertiary and quaternary rainbows in the light of a halogen lamp and made by drops from a spray bottle can be photographed. The quinary rainbow I had not been able to detect back then, so I gave it another try two weeks later (on April 14th, 2018).
I chose a more conventional wide angle lens with f = 18 mm (Pentax DA 18-55 mm at a Pentax K-5 camera) instead of a fisheye this time, so that both the peak illumination intensity and the drops can be confined to a specific rainbow sector without the need to care about the rest of the rainbow circumference. Also, I hoped that a lens hood (which cannot be applied to a fisheye objective) might help somewhat against the wetting of the front lens by drifting drops. However, this did not work out, and the wetting problem did in fact worsen due to the fact that the lens has now to be pointed upward to capture the upper sections of the rainbows against the sky. This creates a much more efficient target for falling drops.
I started with a nice shot of a primary and secondary rainbow against the night sky, which might be mistaken as a lunar rainbow at first glance – but, as mentioned, both illumination and drops were purely artificial:

(10 s, f/3.5, ISO 400)
I then took about 40 pictures, both upwards as well as pointed horizontally to the right side against the vegetation background, without any additional polarizers. A signature of the quinary rainbow appeared in only a single frame of this whole series, recorded shortly after the one shown above. I suppose that even wiping the front less does not help to much after a while, as the lens will fog up again shortly afterwards. The diffuse background resulting from even a slightly fogged lens might be enough to mask the quinary. For the next experiment I plan to install a small battery-powered hairdryer or something of that sort to keep the lens dry. Anyway, here is the picture:

(1 s, f/3.5, ISO 1600)
with increased contrast and saturation:

The arrow points to the green/blue stripe of the quinary rainbow inside Alexander’s dark band.
Ironically, I had taken this only as a fun shoot because of the twisted look of the primary, and did certainly not expect it to be the only reference image for the quinary from this series. At the location of the dark band crossing the primary, the shadow of the spray bottle was cast on the drop cloud, which suppressed part of its “rainbow response”. The remaining drops outside the shadow might have had a different size, and/or the remaining divergence of the light source did play a role. Even at a distance of 10 m from the lamp, a lateral displacement of a drop by 50 cm corresponds to a shift in the lamp position (as seen by this drop) of about 3°. So the deviation of the Minnaert cigar (which has more of an apple shape here) from an ideal cone will still have an appreciable influence. This can only be reduced by increasing the distance to the light source or by confining the drop cloud to a region closer to the camera.
As already mentioned in the last blogpost, and being also visible in the picture above, beautiful supernumeraries at both the primary and secondary rainbows can become visible for several seconds. Finally, here are several pictures that show more of their variety:

(2 s, f/3.5, ISO 200)

(2 s, f/3.5, ISO 400)

(2 s, f/3.5, ISO 100)
How you can photograph tertiary rainbows every night
After almost 7 years since the first successful documentation of higher-order rainbows, we are now aware of at least 40 photographic observations of tertiary bows, sometimes accompanied by quaternaries. It is the more surprising that so far no one seems to have tried an outdoor experiment using artificial light and drop sources to bridge between the natural observation and single-drop scattering experiments, in which caustics are projected onto a screen.
Such an outdoor setup does not only allow to test various cameras and post-processing methods, but may also help to introduce newcomers to the challenges of observing higher order bows against the intense zero order background. Also very practical issues such as drops on the front lens or wet cameras can be directly experienced.
The setup is quite similar to what is used for diamond dust halo observations in Finland. The experiment is carried out at night in order to exploit the optimal background conditions of a dark sky. A bright searchlight lamp creates an almost parallel light beam with small opening angle, in which the camera is placed. Direct illumination of the camera is blocked by a cardboard disc placed roughly halfway between lamp and camera. This also helps in the case of photographing primary and secondary rainbows (i.e. the lens is pointing away from the light source), as stray light entering through the viewfinder on the camera backside can spoil the pictures.
I tested both Xenon (HID) and halogen lamps in the power range of 50-100 W. While Xenon lamps are brighter at the same power consumption, their non-thermal emission spectrum may lead to rainbows whose color is dominated by blue and yellow only, also the emitted light can show unwanted yellowish tinges in certain emission directions. The pictures shown here were therefore taken using the 100 W halogen lamp.
Drops were created by an ordinary spray bottle and, as judged by the appearance of the rainbows, are somewhat smaller than the ones in natural rainbows. Due to wind or movements of the bottle a spatial separation of smaller and larger drops can occur, as indicated by several well formed supernumeraries on both the primary and secondary rainbows which become visible for some moments. However, I decided not study these detail here, and tried to create a more or less spatially homogeneous spray including all available drop sizes over the exposure time of 2-5 s for each picture.
This is how the primary and secondary rainbow look like:

(camera: Pentax K-5, lens: Pentax-DA fisheye 10-17 mm at f = 10 mm, f/3.5, ISO 200, 5 s)
At that time, there was also some light natural drizzling going on, which generated only a weak primary rainbow in the lamplight. The limiting factor here is not the much lesser density of drops than in the spray (this could be helped by longer exposure times or stacking), but rather the background illumination of the sky (the pictures were taken in my garden in Hörlitz, Germany, which is a rather rural, but still pretty illuminated place, and there was also the nearly full moon behind the clouds on the evening of April 1st, 2018).

(f = 10 mm, f/3.5, ISO 200, 30 s)
When reversing the camera viewing direction, the zero order glow (=light which is transmitted through the drops without reflection) is, as expected, the dominant feature in the photographs:

(f = 10 mm, f/3.5, ISO 400, 2 s)
After strong unsharp masking, the tertiary rainbow is extracted, and can be traced almost completely around its full circumference:

As the camera was directed straight to the lamp (and rainbows thus appear as circles around the image center), it is possible to apply a radial smoothing filter to enhance the visibility further:

Here is another picture, taken with the same settings and processed similarly, which clearly shows in addition the quaternary rainbow in the upper left quadrant:


A major problem is that drops on the front lens disturb the recorded rainbows massively, as becomes apparent after unsharp masking. This problem is especially severe when using a fisheye lens (which does not have a suitable lens hood), and under windy conditions which shift the drops into unexpected directions due to swirled gusts near the ground. Periodical wiping of the front lens is therefore indispensable. Of course, the camera itself should be proof against spray water.
It is known from calculations that the contrast of the tertiary rainbow lies close to the detection limit of the human eye (see here and here), at least for purely spherical water drops. Here, no traces of it could be seen directly, even when looking through a polarizer. The main problem is that the spray lifetime is only a few seconds and the observer is constantly busy to maintain a more or less constant amount of drops in the air, which is rather distracting. A garden hose may be worth testing in the future.
So far, no unambiguous traces of the quinary rainbow (see here and here) could be extracted from Alexander’s dark band, in which its green and blue parts are expected to follow immediately the red rim of the secondary. There are several reasons which make its detection difficult here. At first, the drops are generally smaller and thus the secondary rainbow wider than in a natural setting. Next, the weak but non-zero divergence of the illumination may blur the rainbow positions further. Also, the background includes green plants in some directions which hinders the detection of green rainbow features. A more detailed study using a darker background and a narrower drop size distribution (with appreciable supernumeraries) seems necessary.
Searching for Sub-Visual Atmospheric Structures in the Daytime Sky
On sunny, warm days the sun heats the Earth’s surface and the air close to it. Periodically a parcel of air will rise from this area due to the warmed air being buoyant. This parcel is thought to rise in an elongated column of fairly large size such that several hundred tons of air are lofted skyward. In doing so many of the particles generated by Earth-bound processes (pollen, smoke, dust, pollution, water vapor, etc.) are brought with it. These particles are commonly known as aerosols. If the column reaches an altitude where the contained water vapor condenses then a cumulus cloud will form.
It is known that aerosols have a large effect on polarization of light, up to 30% or so. My first experiment in photographing these columns of air was to take 2 sequential photos of the sky with a linear polarization filter set to 90 degrees apart. Then in accordance with the article excerpt shown below and using an image processing program (Image Magik) I calculated the degree of linear polarization (DOLP) of each pixel from the formula given in the article. The resulting pictures are interesting and strange but do not show the expected structures.
I encourage others to make their own attempt at this goal as I am really a novice at image processing. No doubt there are many other ways of looking at this problem and I welcome all comments, thoughts and ideas. Thanks!
Excerpt from the article “Digital All-Sky Polarization Imaging of Partly Cloudy Skies” from Nathan J. Pust and Joseph A. Shaw
“It is our feeling that unseen aerosols and possibly thin clouds in what has recently been called the “twilight zone” between a cloud and the clear sky are reducing the DOLP in what appears to be clear sky. We believe that this effect on the sky polarization is directly related to the recently described observations of enhanced optical depth near clouds. In partially cloudy skies, we see DOLP reductions in clear sky areas between clouds that appear to be caused by subvisual aerosols and/or clouds. (Even though clouds appear to have hard edges, they are in fact surrounded by thin clouds.) Furthermore, these DOLP reductions show up in the clear sky long before we can physically see clouds in the sky.”
To determine Degree of Linear Polarization (DOLP) in each pixel he uses this formula:
(Image1pixel value – Image2pixelvalue) / (Image1pixel value + Image2pixelvalue)
Then he normalizes and stretches the result so it fills the whole 8 bit range of 0 to 255 pixel brightness values.
Some of my resulting pictures:


Author: Deane Williams, Connecticut, USA
Binary double rainbows

In past years I have done spot light rainbows when the rain was a fine mist. After seeing the results of a nice fog bow my LED flashlight made and since I had two I thought why don’t I try doing two at once. So I turned both lights on the hi-power mode which yielded a very bright beam of light and both lights were placed on fence posts 2 meters apart. I angled the lights so the beams crossed and at the point where they crossed is where I placed the camera. I took a shot was blown away by the results! There it was two full circle double rainbows crossing one another. I took quite a few shots before I was getting chill and wet. Just think if you landed on an Earth like exo-planet orbiting a binary star system and upon exiting your space craft you look up and see twin suns shining above then you hear a rumble of thunder. You retreat into your ship for shelter and later the storm moves on but its still raining but you look on the opposite side of the sky and see two double rainbows displaced a few degrees apart and the bows would cross one another. These flashlight binary double rainbows show how rainbows would look to civilizations living on Earth like Exo-planets orbiting double, triple, or even quadruple star systems. Next time I will use 3 and 4 LED flashlights. On the nights I was doing these bows the wind was blowing and I could see the primary bow in particular would move from side to side and one pic even shows that it could be twinned!!!


Author: Michael Ellestad, USA
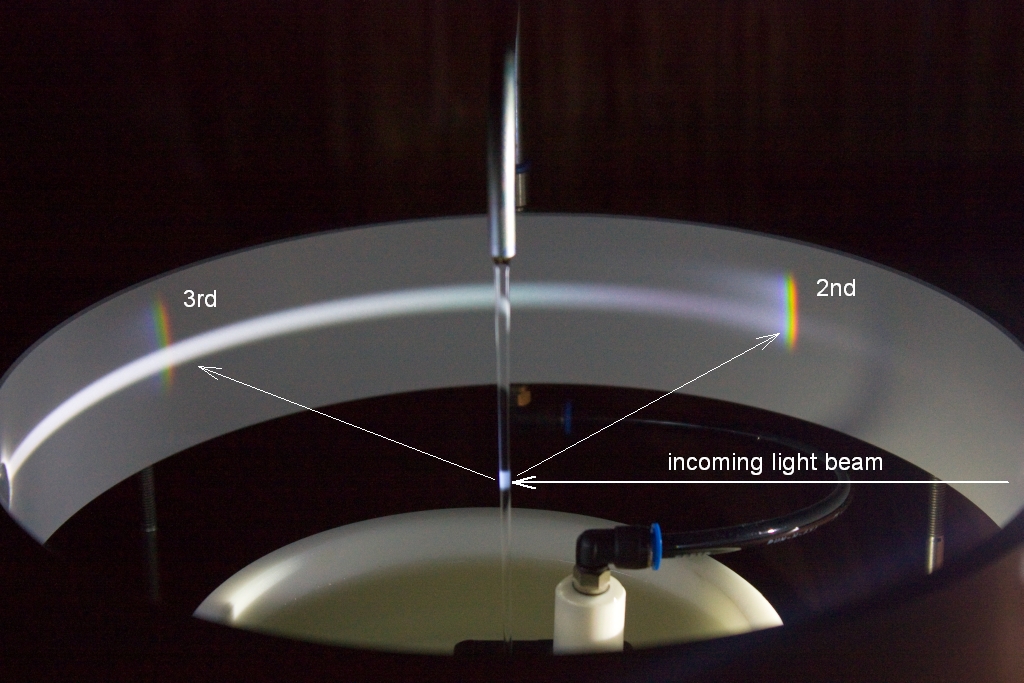
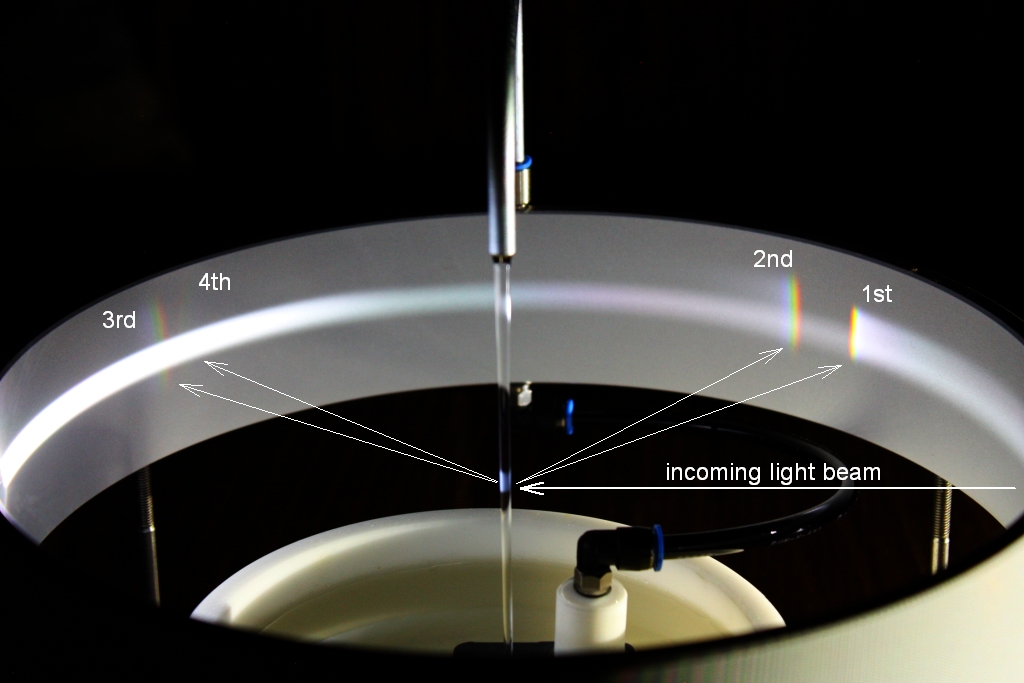
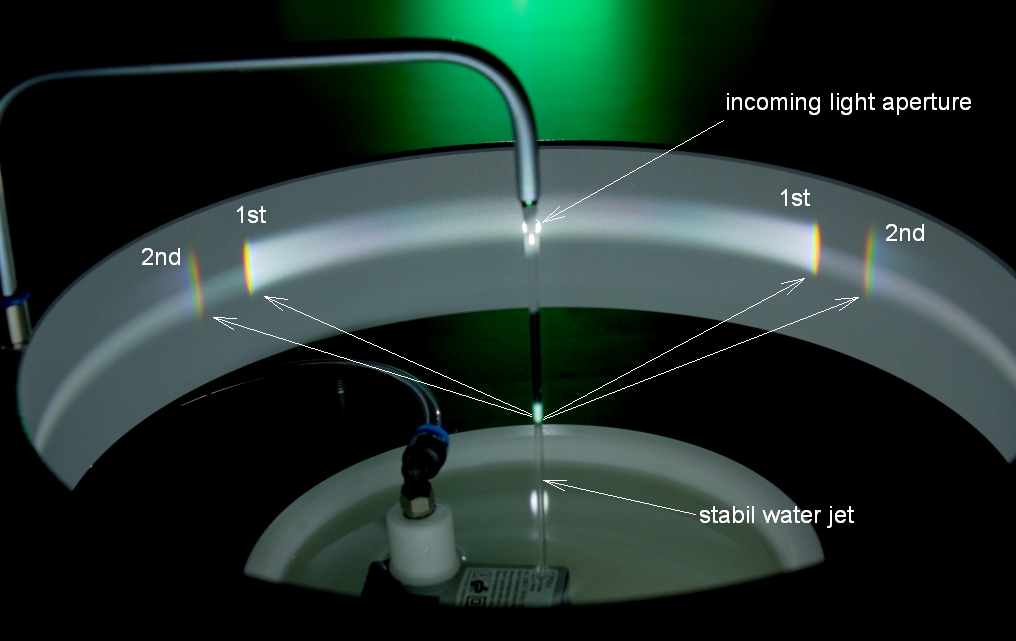
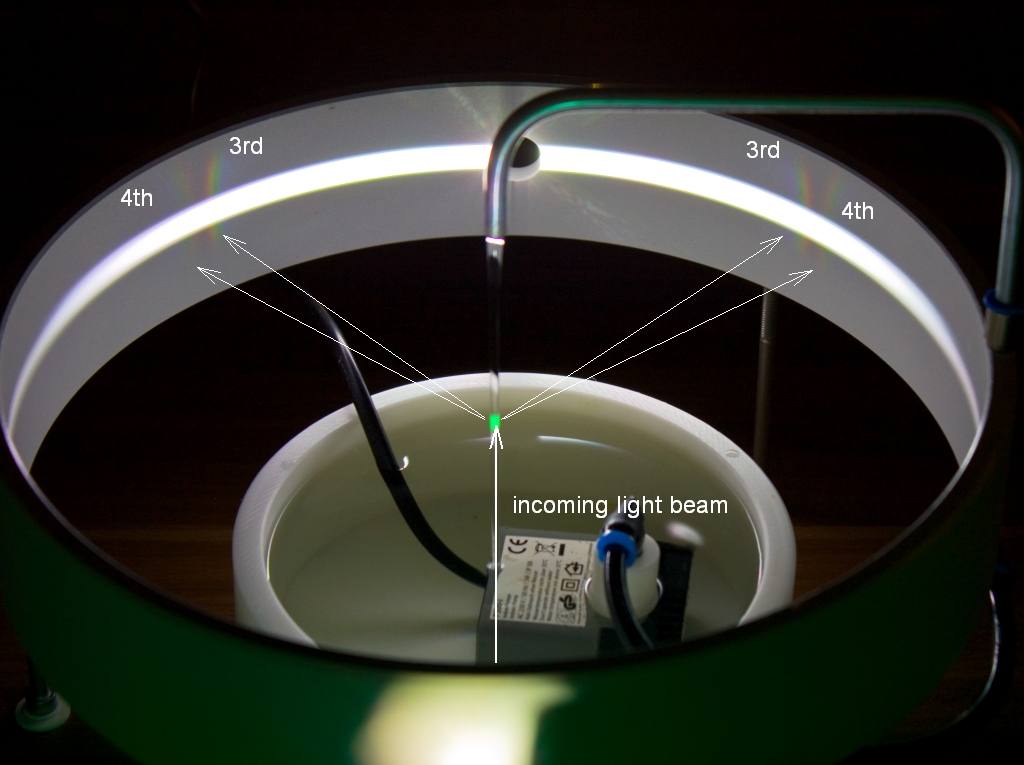
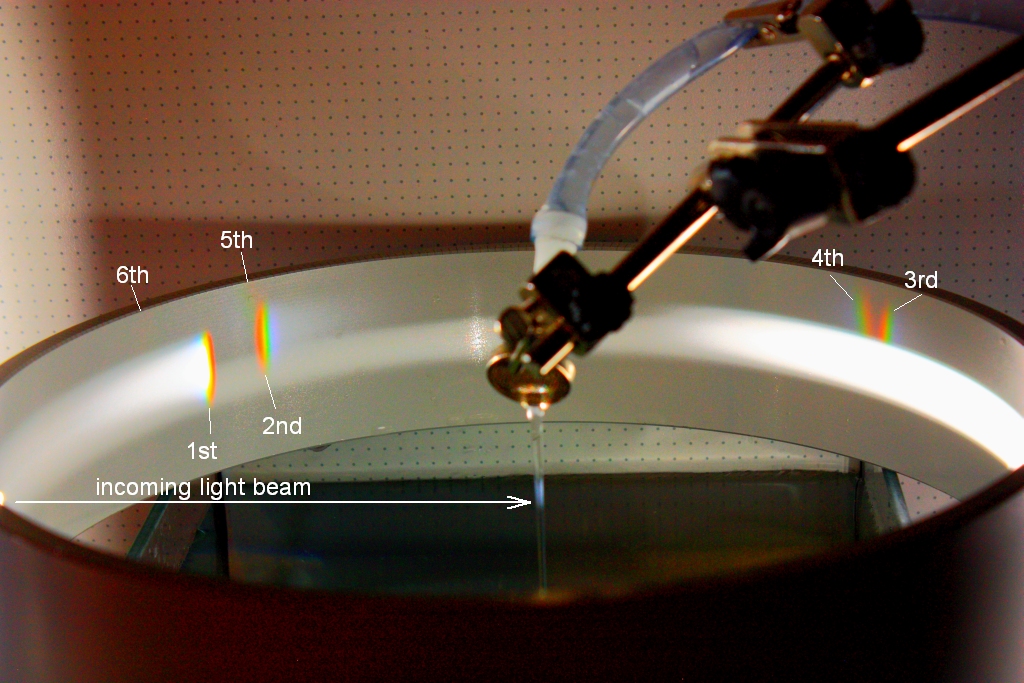
“Spektrodrom” – A Laboratory of Rainbow

The simulation of rainbows of many orders with hanging or standing water drops and laser light is straightforward, but often unrealistic due to deformation of the drops. Therefore, a modern version of Billet’s experiments was designed, which uses a laminar cylindrical flow of water, and white light by just a few pixels of a video projector. It is surrounded by a circular projection screen. Using slightly skewed rays, which are therefore “climbing” up the cylindrical beam of water and exiting from it in proportion to the number of partial reflections, is able to produce a simultaneous display of the first six rainbow orders in white light.
Animation about the different refraction angle beetween salty water and fresh water.
Author: Michael Großmann, Kämpfelbach, Germany
The black drop effect is not an atmospheric phenomenon
The so-called black drop effect is an optical phenomenon which can be seen during transits of Mercury or Venus in front of the sun. It can only be observed through a telescope protected against the bright sunlight. When the planet begins to cover the sun, it seems as if the silhouette of the planet would form a kind of black drop when it detaches from the rim of the solar disk. The same effect appears again when the silhouette touches the rim of the solar disk at the end of the transit. It looks as if the planet merges with the rim of the solar disk like two converging drops of water.
Originally astronomers thought that this phenomenon was caused by different refraction of light in the atmospheres of the planets. But today we know that the phenomenon is caused by the limited resolving capacity of the telescopes used. In this context experts often refer to an experiment which everybody can realize using his own fingers:
Just form a ring with your thumb and your trigger finger, but exactly so that the fingers just do not touch each other. Hold this narrow gap in font of your eyes, so near that they cannot focus it. A “shadow bridge” appears between the fingers, especially when the fingers are held in a different distance from the eyes and you start closing the gap by changing the perspective. The shadow bridge then moves from the finger which is further away from your eyes to the closer one.
 Shadow bridge between thumb and trigger finger. The camera had been focused behind the fingers

The gap between the fingers has been exactly focused a no shadow bridge appears
Important for the successful execution of this experiment is that your eyes are defocused. If you move the fingers away from your eyes so that they can focus them, the shadow bridge completely disappears.
I slightly modified and analyzed this simple experiment. Instead of two fingers, I only used one, but in front of a pattern of blue and white stripes.

Shadow bridge experiment No.2: Heavily defocused photograph of my trigger finger in front of a background of blue and white stripes
With this method I observed two sources of fuzziness , which are the silhouette of the dark brown finger and that of the stripes. In front of the dark stripes, the area of fuzziness of the finger appears more tangent than in font of the white ones. This gives the impression of the finger being as double as wide in front of the blue stripes compared to the white ones. In reality, however, the fuzziness of the finger is always the same as I tried to keep it parallel to the background and perpendicular to the line of sight. The most interesting area is that where the fuzziness of the finger meets the fuzziness of a blue line. There it also causes a deeper tinting of the blue area. As a consequence, a kind of dark “mound” forms in the zone of fuzziness of the blue area which points in direction to the finger tip. Moving the finger so, that its silhouette touches the outer rim of the fuzziness between the blue and the white line makes a shadow bridge appear.

Completed “shadow bridge”
Using this knowledge, you can easily simulate a transiting planet yourself. The experiment is very simple. Just draw a white circle with a black background on your computer and print it. Then die-cut a circle out of a sheet of black paper using a hole puncher. You only need the chad to represent the planet. Put this on a clear CD-cover and put this onto your printed solar disk, so that the planet lies as near to the rim of the solar disk as possible. Here are an animation and two photos illustrating the black drop effect, an exactly focused one with no black drop effect, and another, defocused one, in which the black drop effect appears.

Simulated black drop effect. The picture on the left is exactly focused and shows no “shadow bridge”. The photograph on the right is defocused and shows a “shadow bridge”
Author: Reinhard Nitze, Barsinghausen, Germany
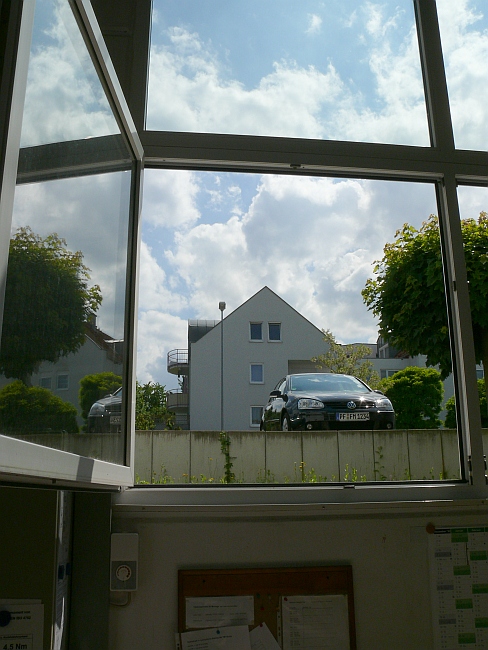
The crossed bows

What kind of rainbow is that? This is no fake this is real! Ok…it’s a little trick with an open window and the right angle to the sun.
The rainbow are produced with a water spray bottle. The right bow is the “real one” and the left bow is the reflected one.
The reflected surface in this example is the window in vertical direction, so the bows looks like a “x”. (2)
Place : Pforzheim, Germany
Time : 18 May 2011
Digital Camera : Panasonic DMC-FZ50
Exposure : 1/200 sec , f/3.6 , ISO 100
Author: Michael Großmann, Kämpfelbach, Germany
High order bows

A rainbow is a product of millions of falling raindrops interacting with sunlight. A single reflection form the primary bow, a double reflection forms the secondary bow. However, under ideal conditions there can be many more orders of reflection. As shown above, five, six and even ten internal reflections can be observed. Moreover, it’s theoretically possible to detect twenty internal reflections, but the problem is to produce a perfectly spherical water droplet. The drops I used for this experiment were formed artificially. The light source is a 5 mW green laser pointer. Note that the bright spot at left center is the laser illuminated water drop.
The third and fourth order reflections aren’t shown here because they, along with the seventh and eighth order reflections, are positioned on the other side of the picture in the direction of the light source. The primary and secondary bows will be viewed in the direction you’re facing opposite the sun The fifth, sixth, ninth, and tenth order reflections are also in this direction. However, the third and fourth (as well as the seventh and eighth) order reflections can’t be seen because they’re behind you.
Under exceptional atmospheric conditions it may be feasible to see the third and fourth order bows if you’re facing the sun, but they’re quite faint. A third order bow, for instance, is one quarter as bright as a primary bow. A fifth order rainbow is only about one tenth as intense as the primary bow.
If you need more information about the experiments with high order bows, you can read this pdf.
Nikon D40X, focal length 18mm, 100 ISO, 2,5 sec. at f/6,3
Author: Michael Großmann, Kämpfelbach, Germany
Tertiary Glass-Sphere Bow

I have discovered a spectral reflection phenomenon inside a transparent plexiglass-sphere. The phenomenon, of which I am almost sure it is NOT the equivalent of the Primary or Secondary Rainbow, is in fact the equivalent of the Tertiary Rainbow, visible as a bright illuminating spectral colored ring all along the limb of the sphere. To see this ring, one should look “from behind” the sphere, toward the sun, with the sun “in front” of it (appearing exactly “in the centre” of the sphere).
The photo show the sphere with appearance of the red component of the spectrum. The distance of the observing eye (or camera’s lens) to the sphere is VERY important, because the focal point of the ring is not a point, it’s a spectral colored line (red at the far end, blue at the near end).
As far as I know, no one has ever observed or photographed the ring-like appearance of, what I call, the Tertiary Glass-sphere Bow (which has a focal point or “line”, behind the globe!).
Author: Danny Caes, Ghent-Belgium
